Answers
I. Improved Boost/Bury Entities Query Rule
This feature will allow for the ability to select entities for the BOOST_ENTITES/BURY_ENTITIES action using a saved filter from the Knowledge Graph. You no longer need to specify each individual entity when using this rule. This will be particularly useful when boosting/burying entities in bulk. For example, let’s say you’re a Healthcare company, you could create a Saved Filter to group “spine specialists” (any doctor with the specialty field = spine) and boost them to the top for any query that involves “Spine”. This way any doctors with Spine Specialty who get added to the platform will immediately fall into the filter without having to manually edit the config to add the new Entity ID.
To do so, you would first create the Saved Filter in Knowledge Graph. You can review how to create Saved Filters in this training here
Then, under the Search Configuration, you can add the savedFilterID to boost/bury these entities like so:
{
    "criteria": {
       "searchTermContains": [
         "spine"
       ]
     },
"actions": [
       {
         "actionType": "BOOST_ENTITIES",
         "filter": {
            "savedFilterId": {
                "$eq": "1234"
             }
           },
         ],
         "verticalKey": "providers"
       }
     ]
   }
We also are introducing a new forceResults option to determine if entities are always boosted, or only boosted if they were already in search results. The default behavior already matches forceResults set to true, which means that if the entity is not returned in the results without the action, by default BOOST_ENTITIES will add the entity to the results set. However, setting it to false would specify that the BOOST_ENTITES action should only happen if the entities are already in the search results.
Have any feedback or questions? Leave us a note in the Community here.
II. Answers Hitchhikers Theme v1.19
The latest Answers Hitchhiker Theme (v1.19) includes:
- Refreshed UI, featuring new default colors, expanded container width, and a new default font
- Faster Preview Generation that speeds up the webpack step in the preview update by taking advantage of development mode
- Updated CTA Position on Product Cards by popular demand from you all
- A few minor bug fixes/improvements that may help improve your experience
Thinking about upgrading? Please read the detailed Refreshed UI and Faster Preview Generation posts carefully for upgrade considerations / instructions.
Have any feedback or questions? Leave us a note in the Community by clicking on a feature above.
III. Labels for Facets
You can now add labels to facets! By default, facet names are taken from the Knowledge Graph field name, but now you have the flexibility to override the name of the facet in your Answers Frontend. This is particularly useful when using built-in profile fields which have fixed Knowledge Graph field names. For example, you may want the Knowledge Graph field titled “Insurance Accepted” to read “Our accepted insurances” when users are searching for Locations.
To override the name, you can set label in the fields in your Facets configuration (under componentSettings in your config.json). This controls the label for the facet itself (such as “Insurance Accepted”), not the facet options (such as “cigna”, “blue cross blue shield”, etc).
Your syntax could look as follows:
"componentSettings": {
  "Facets": {
    "fields": {
        "insuranceAccepted": {
            "label": "Our accepted insurances",
            "searchable": true,
            "searchLabelText": "Search for insurance accepted",
            "placeholderText": "Search"
        }
     }
  }
}
Have any feedback or questions? Leave us a note in the Community here.
Platform
I. Refreshed User Management UI
Improvements have been made to the User Management screens.
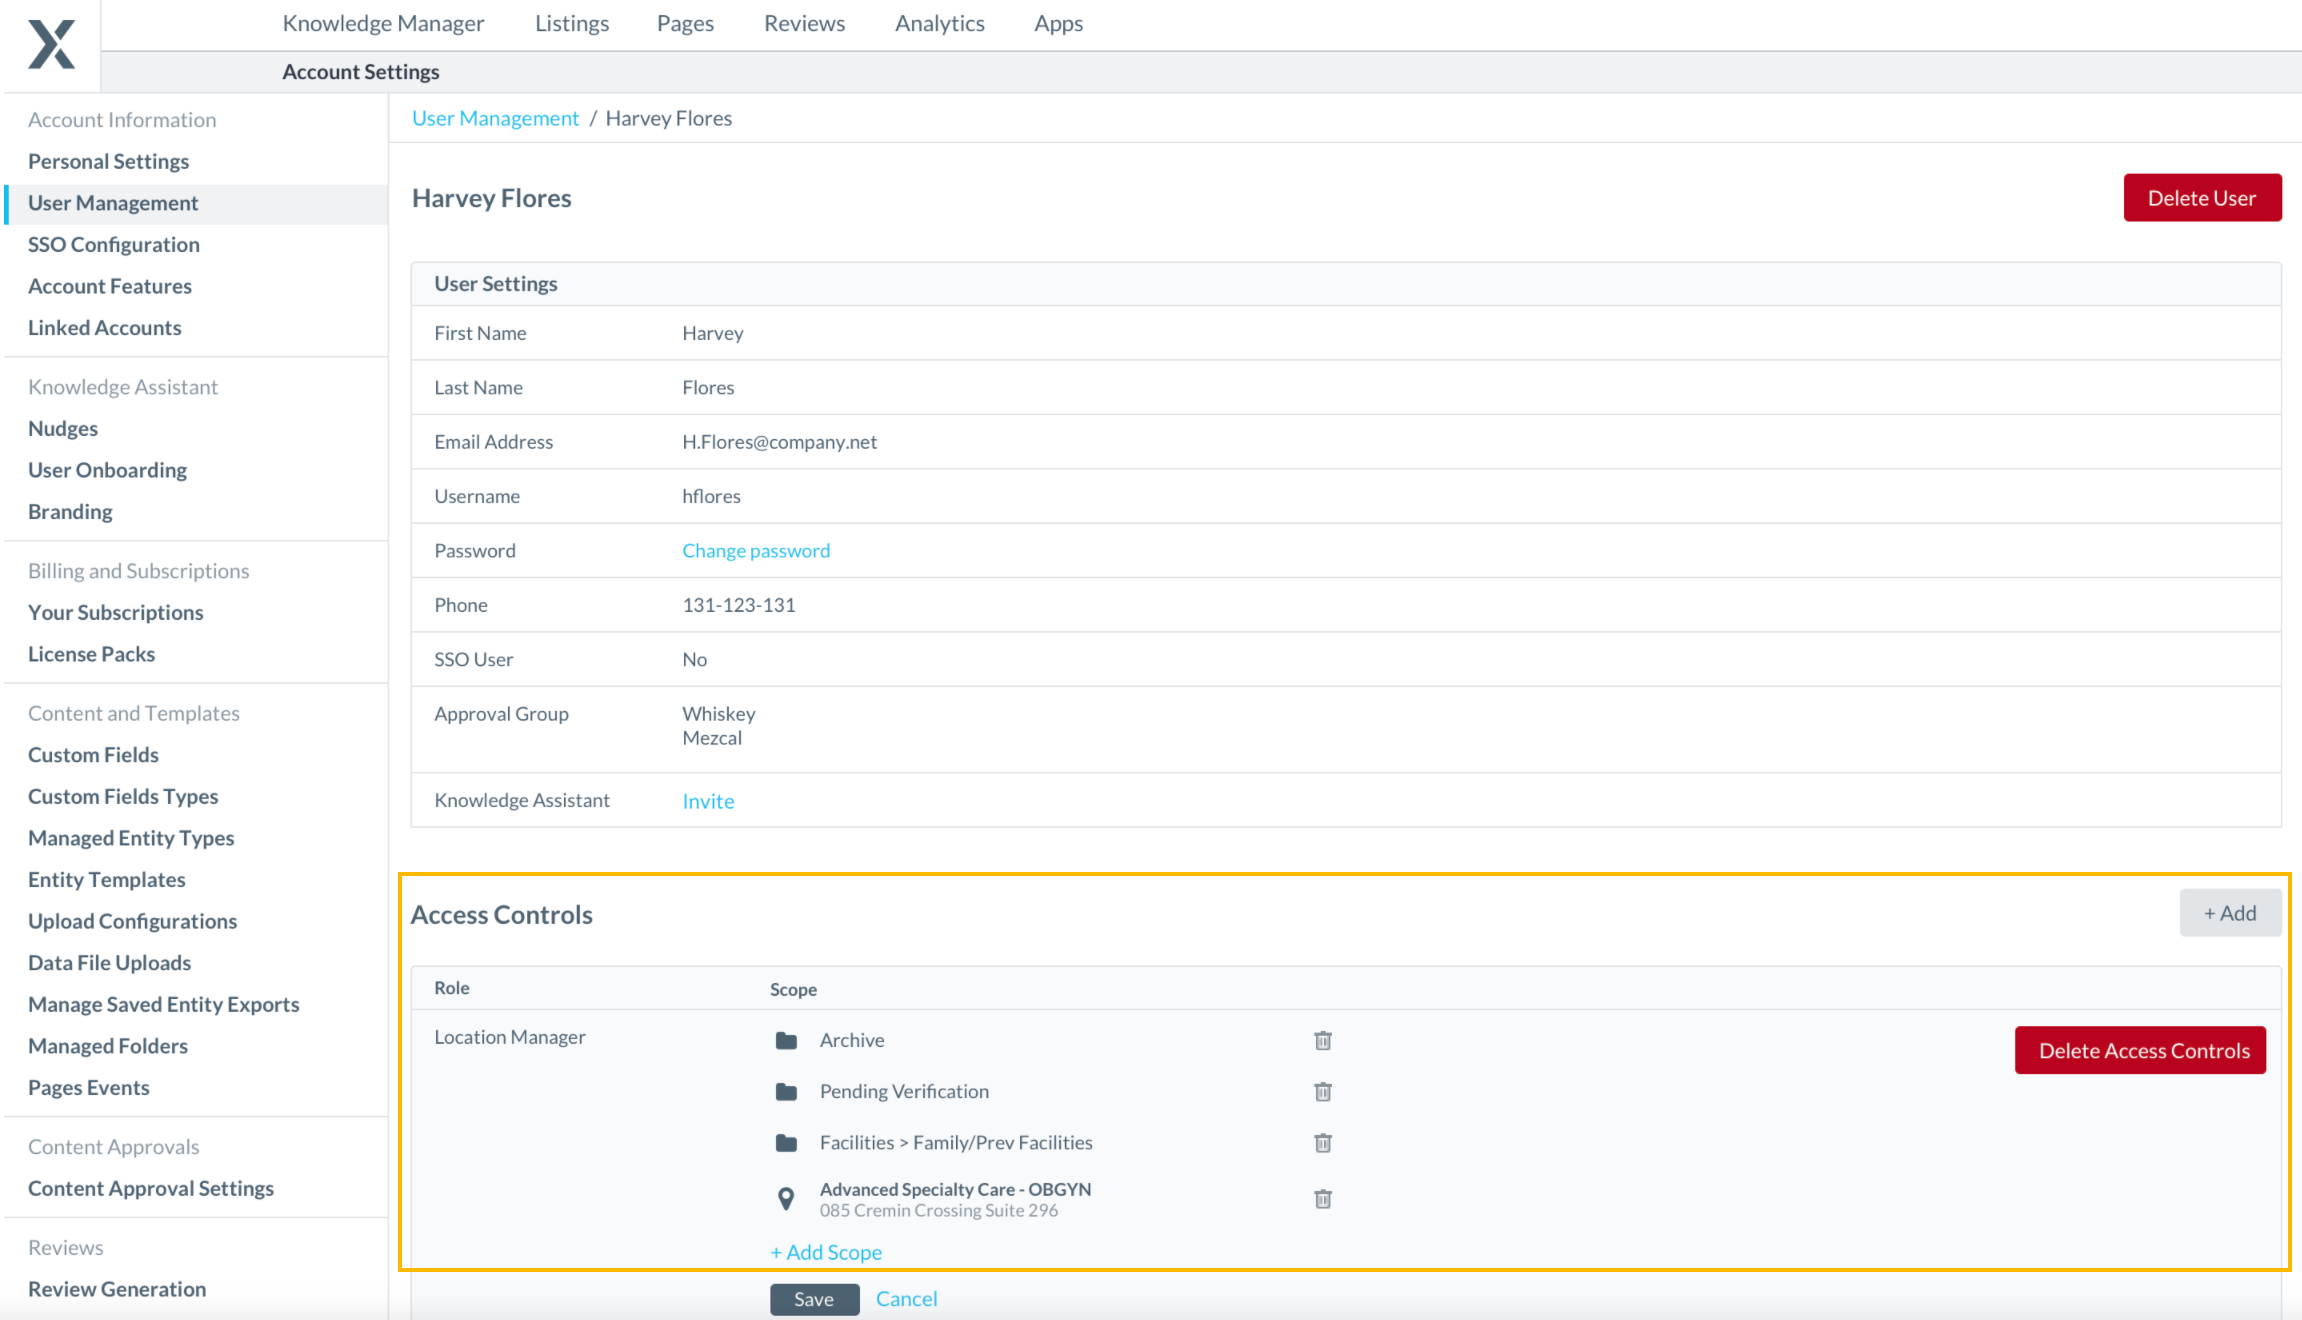
With the addition of an Access Controls section of User Management you can more easily see Access Permissions when viewing, editing or creating users.
Details of these enhancements can be seen in all of the areas listed below:
Viewing and Editing Users
When you navigate to the User Management screen you will now see an Access Controls section of the page.
In this section, you can see the Roles that are assigned to the user, which allows you to more easily see Access Permissions when viewing, editing or creating users.
This section includes a table where you can see all of the Roles assigned to the user, allowing you to more easily see Access Permissions when viewing, editing existing users.

Adding New Permissions to Users
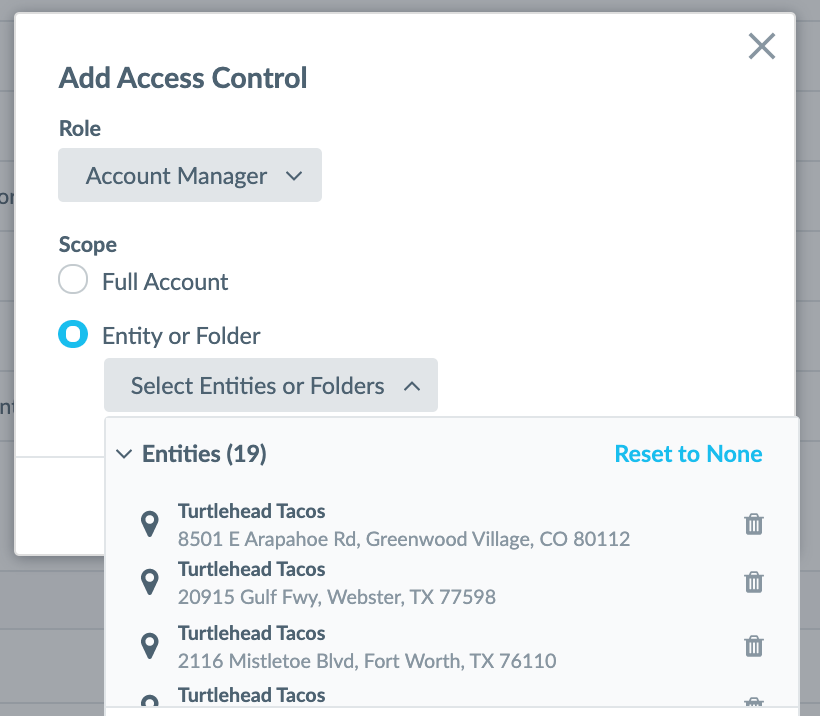
To add additional permissions to a user you can simply click on the new + Add button in the Access Control section.
You can then select the Role, and the Scope that you would like to apply to this user a single modal.
The updated design also comes with a functionality update where you can now add multiple permissions to a user at once if they are on the same role. In the example below this user will now have the ‘Account Manager’ role for 19 entities within the account.

Deleting Access Controls
Similarly to adding additional controls, you can also easily remove permissions, either in bulk, or one by one by clicking the Delete Access Controls button or by clicking on the trashcan icon next to the individual permission.

To learn more about User Management, visit the Users training module.
Have any feedback or questions? Leave us a note in the Community here.
Knowledge Graph
I. Price Range Field Added to Location Entity
The Price Range field is now available for all location entities.
This field is a drop-down that allows you to choose a range from “$” to “$$” depending on your pricing. Price Range can be sent to various supported endpoints including Listings and Pages to help you provide customers with even more information about your business.

In addition to Entity Edit, you can also add this field to entities using the Data Upload tool. To do this, enter the appropriate number of dollar signs in your spreadsheet. Note that the dollar sign is the only supported symbol in the upload, and should be used for all regions and currencies.

Previously, the Price Range field was only available on the location entity in certain circumstances or with specific subscriptions.
Have any feedback or questions? Leave us a note in the Community here.